
The Layout Paragraphs module gives content editors an elegant drag-and-drop interface for visualizing page layouts. A “layout paragraph” is a paragraph that can have child paragraphs nested inside of it, and these children can be placed in a variety of “layouts,” from single-column layouts to multi-column grids. The module comes with a few layouts out of the box, but what happens if you need something custom? Luckily, Layout Paragraphs was created using Drupal’s Layout API, meaning it’s easy to extend and customize.
Before we begin: Install, Enable, and Configure Layout Paragraphs
Installing and enabling this module is no different than any other Drupal 8/9 module. The module’s project page also has some helpful steps on how you can set up your first layout paragraph under the “Getting Started” section.
Creating a custom layout
While there are a lot of parts to consider when creating a custom layout, the process is pretty straightforward. For this tutorial, let’s create a four-column layout.
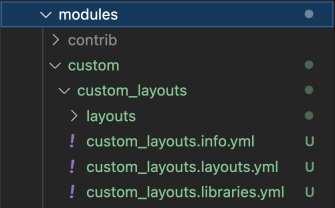
Step 1: Create a custom module
In order to declare our custom layout, we’ll have to create a custom module. Your directory structure for this module should look a little something like this:
Step 2: Add a Twig and CSS file for your custom layout inside of the layouts directory
Start by creating a folder with the desired machine name of your custom layout inside of the layouts directory (keeping each layout in its own folder helps keep things tidy). For our four-column layout example, let's name this folder fourcol.
Inside this folder, you’ll need a Twig template (to determine the html structure of the layout) and a CSS file (to position your layout regions correctly). These files will be used by the layout paragraphs module when you or a content editor edits a node, and like other templates and CSS, they can be overridden in your theme if necessary.
Example template for layout--fourcol.twig.html
{%
  set classes = [
    'layout',
    'layout--fourcol',
  ]
%}
{% if content %}
  <div{{ attributes.addClass(classes) }}>
    {% if content.top %}
      <div {{ region_attributes.top.addClass('layout__region', 'layout__region--top') }}>
        {{ content.top }}
      </div>
    {% endif %}

    {% if content.first %}
      <div {{ region_attributes.first.addClass('layout__region', 'layout__region--first', 'layout__region--column') }}>
        {{ content.first }}
      </div>
    {% endif %}

    {% if content.second %}
      <div {{ region_attributes.second.addClass('layout__region', 'layout__region--second', 'layout__region--column') }}>
        {{ content.second }}
      </div>
    {% endif %}

    {% if content.third %}
      <div {{ region_attributes.third.addClass('layout__region', 'layout__region--third', 'layout__region--column') }}>
        {{ content.third }}
      </div>
    {% endif %}

    {% if content.fourth %}
      <div {{ region_attributes.fourth.addClass('layout__region', 'layout__region--fourth', 'layout__region--column') }}>
        {{ content.fourth }}
      </div>
    {% endif %}

    {% if content.bottom %}
      <div {{ region_attributes.bottom.addClass('layout__region', 'layout__region--bottom') }}>
        {{ content.bottom }}
      </div>
    {% endif %}
  </div>
{% endif %}
Make a note of the content region names that you use in this file because we will be reusing them later on when we declare our layout.
Example CSS file for fourcol.css
.layout--fourcol {
  display: flex;
  flex-wrap: wrap;
}

.layout--fourcol > .layout__region {
  flex: 0 1 100%;
}

@media screen and (min-width: 40em) {
  .layout--fourcol > .layout__region--column {
    flex: 0 1 25%;
  }
}
Step 3: Create a new library in [module_name].libraries.yml
To apply the CSS that we just created to our custom layout, we’ll need to declare a new library that points to our CSS file.
fourcol:
  css:
    theme:
      layouts/fourcol/fourcol.css: {}
Step 4: Declare the new layout in [module_name].layouts.yml
In this step, we’ll put everything together in a way that the Layout Paragraphs module can understand. First, we’ll declare a new layout and give it some information, like a human-readable label, the path to the template and library, the default region that content is added into, and even a category if you choose to add one.
layout_fourcol:
  label: 'Four columns'
  path: layouts/fourcol
  template: layout--fourcol
  library: custom_layouts/fourcol
  category: 'Columns: 4'
  default_region: first
The next thing to do is to declare the regions that are used in the layout. Remember the region names that we used in our Twig template? We’ll be reusing those here.
regions:
  top:
    label: Top
  first:
    label: First
  second:
    label: Second
  third:
    label: Third
  fourth:
    label: Fourth
  bottom:
    label: Bottom
Finally, we’ll build an icon map, which will help the Layout Paragraphs module display a basic image that represents the way the layout will look on the front-end. Building an icon map is surprisingly easy. Each row corresponds to the number of rows in the layout, and each item within a row represents a column. For our four-column layout, our icon map would look something like this:
icon_map:
  - [top]
  - [first, second, third, fourth]
  - [bottom]
Have regions that span multiple columns? No worries. Duplicating the name of a region within a row will determine the number of columns that it takes up. For example, if we wanted one of our regions to take up 2 columns instead of one, we would do something like this:
icon_map:
  - [top]
  - [first, first, second, third]
  - [bottom]
Here's our full entry for the four-column layout:
layout_fourcol:
  label: 'Four columns'
  path: layouts/fourcol
  template: layout--fourcol
  library: gh_display/fourcol
  category: 'Columns: 4'
  default_region: first
  icon_map:
    - [top]
    - [first, second, third, fourth]
    - [bottom]
  regions:
    top:
      label: Top
    first:
      label: First
    second:
      label: Second
    third:
      label: Third
    fourth:
      label: Fourth
    bottom:
      label: Bottom
Step 5: Use your new custom layout (or repeat as needed)
Now you’re ready to use your custom layout! Simply enable the custom module you just created (if you haven’t already), clear the cache, and then find the new layout in the layout paragraph options list. To add multiple custom layouts, repeat steps 2 through 5 as many times as necessary!